MakerBit_mp3

Connecting to the MakerBit
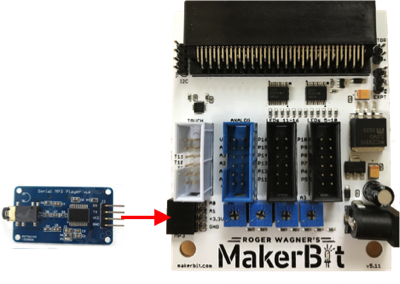
The MakerBit has a connection on the left side of the board for the mp3 playback module.
Insert the 4 pins of the mp3 playback module into the 4 sockets of the MakerBit connector.
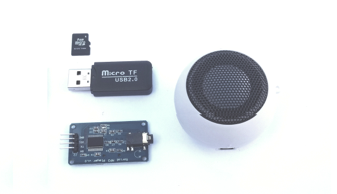
Connect any speaker or headphone to the audio jack of the audio playback module.
This can be used either with or without a computer attached. When the MakerBit is not attached to a computer, and is in the self-running mode, each touch sensor turns on a corresponding LED.
Touching sensor 16 changes the group of audio tracks used for the other sensors, so that alternate languages can be used, or other techniques such as long & short explanation, different musical sounds, etc.

Sound Files on the microSD Card
The Audio Narration Add-On includes a microSD card that has been pre-loaded with sample soundtracks that are appropriate for the example volcano project. There are also start-up sound tracks that related to the MakerBit itself.
Sound files on the microSD card are all in one or more folders at the first directory level of the SD card named “01”, "02", "03" and "99". Files within those folders should be named "001xxxx", then "005xxx", "006xxx", etc. where "005", "006" etc. will be the sensor number that will play that track, and "xxx" can be any series of characters. The files can be either .mp3 or .wav files. You can replace the mp3 files on the microSD card with your own .wav or .mp3 files. Folder 99 is used by the HyperDuino program to play the device startup sounds.
You can click here to download a .zip file of a sample set of audio files that are used with the volcano tutorial.
When operating with the MakerBit Media Linker, touch sensors will not directly turn on LEDs, but the audio tracks will be played when a sensor is touched. LED control is done by the “Arriving at Media” and “End of Media” settings in a media list.
How to Record Sounds
For more information on how to record your own sounds for the microSD card and the mp3 player, see this section of the documentation on the Audio Narration Add-On.
Demonstrations
With the touch sensors, you can make a "piano" where each sensor plays a different note. Those notes can also be samples of any musical instrument. You can find the instructions for that here. With MakeCode, you can also program your own mp3 player device with multiple songs and albums.
This version of the MakerBit program for the micro:bit can play .mp3 or .wav files on a microSD card using a mp3 player module shown below, and which is available in the Audio Narration Add-On for the MakerBit.
With the MakerBit_mp3 program installed on the MakerBit, each touch sensor will play one sound track when the sensor is touched.
With a computer attached and the MakerBit Media Linker running, tracks will play along with whatever Internet-based media is displayed. You probably wouldn’t want sound from both the mp3 player and a video, but you might want to have music, narration or other audio accompany “silent” Internet media such as photos, maps, etc. For example, this would be a way to add narration to a Google Maps or Google Earth display.
One easy way of creating alternate spoken languages is to use translate.google.com, and then use a screen recorder with audio ability (or use your mobile device in a quiet environment) to capture the audio.
Note that when each directory change is made, track "001" in the folder will be played so as to provide some feedback for which folder (language) has just become active.
If you have the MakerBit+R (with the green/orange connectors for motors), click here or on the image on the right for alternate instructions specific to that board.


MakerBit
Here is a holiday model created using LEDs and the mp3 player module to play different sound tracks when sensors in the model are touched.
Here is a LEGO "Women of NASA" kit enhanced with LEDs and the audio narration kit to play different sound tracks when sensors in the model are touched. This example was done with the HyperDuino, but the setup and results are the same for both the HyperDuino and the MakerBit.
Here is the Booo Book, an interactive book created by Nancy Smith, aka Aunt Goodiebags, using the MakerBit and the Audio Narration Add-on.

